



CATHIE FILIAN's Handmade Happy Hour

Crafty Mom - Mess Maker - Content Creator

Find and Follow Me Here!

Facebook240
YouTube40
YouTube
Set Youtube Channel ID
Pinterest15
Pinterest
fb-share-icon
Instagram38
Tiktok46
  • Hello!
    • Hello! I’m Cathie Filian
    • Let’s Link Up!
    • News + Updates
    • The Filian Family
    • Featured On
    • Television
      • Creative Juice – HGTV
      • Craft Wars – TLC
      • Witch Crafts – DIY Network
      • Creative Juice Holiday Special
      • HSN and QVC
      • EMMY Awards
    • Product Design
      • Mod Melter, Molds & Melts
      • Mod Podge Accessories
      • Hot Glue Gun Helpers
      • Jewel Box POP
      • Product Design Awards
    • Books by Cathie
      • 101 Tees
      • 101 Snappy Fashions
      • DecoDen Desserts
      • Bow Wow WOW!
      • Creative Juice Book
      • Contributed + Featured
    • diary
  • YouTube
  • Holidays & Celebrations
    • Christmas
    • Halloween
    • Easter
    • Valentines Day
    • New Year’s Eve
    • St. Patrick’s Day
    • 4th Of July
    • Thanksgiving
    • Weddings
    • Baby Shower
    • Mother’s Day
    • Father’s Day
    • Party Ideas
    • Game Day
    • Graduation
    • Teacher Gifts
  • Character DIYs
  • Crafts
    • Mod Podge Crafts
    • DIY Videos
    • Fashion
    • Sewing Projects
    • DIY Beauty
    • Home and Garden
    • Furniture Flip
    • Clay and Resin
    • Resin
    • Scrapbooking
    • Ideas for Kids and Families
    • PTA School Projects
  • Eat & Drink
  • Hello Crafty Kids
  • HGTV’s Creative Juice
  • Amazon Shop
  • Theme Parks & Cool Places

Make It: Two Ways to Seal Envelopes with Wax

March 8, 2009 · by: Cathie Filian

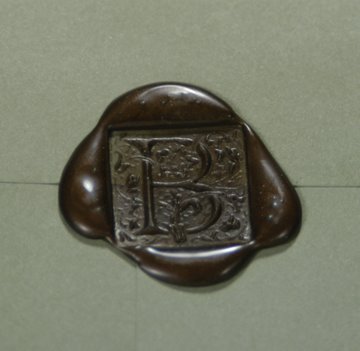
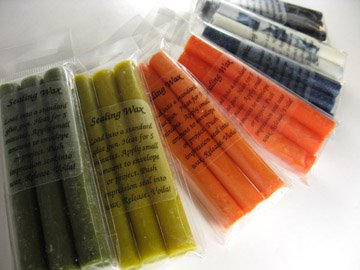
With wedding season just around the corner, I started thinking about wax seals again. I have two techniques that work great for wax sealing. The first technique uses traditional wax sticks that are melted with a flame. The second, uses wax “hot glue” sticks. The sticks are not hot glue, they are a wax that melts in a glue gun.
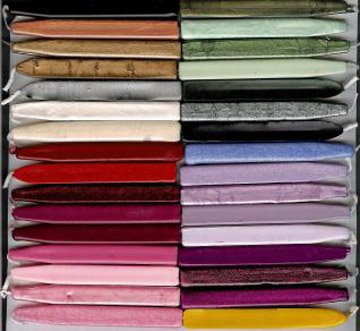
These sticks are from Scribes Delight.
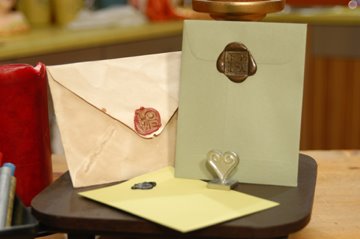
Make It: Sealing Envelopes with Wax Sticks
This is from the Global Shipping episode of Creative Juice

Materials:
coffee – cooled
sealing wax stick
metal seal
envelopes
paper
matches
optional: metallic stamp pad

Steps:
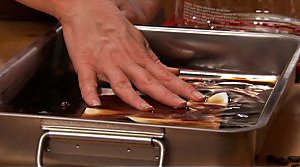
1. To create an antique look, wrinkle up an envelope and soak it in a coffee bath for a few seconds. Blot to remove excess moisture and set aside to dry.
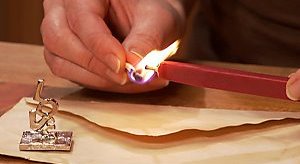

2. Light the wax stick’s wick and tilt the stick at a slight angle over the envelope, lit end facing down.
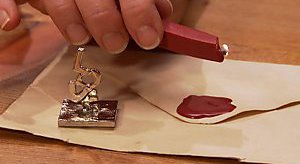
3. Holding the stick over the area for the seal, let the wax flow onto the envelope until there is enough wax for a seal (10 to 15 seconds of melting wax should produce enough wax for an average 1/4″-diameter seal). Be careful not to get soot in the wax.

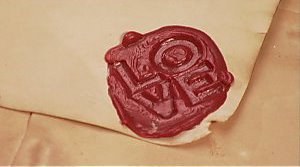
4. Press the seal into the wax; remove by lifting straight up. If the wax won’t let go of the seal, rest the seal on the wax until it’s completely cool, then lift the seal off.
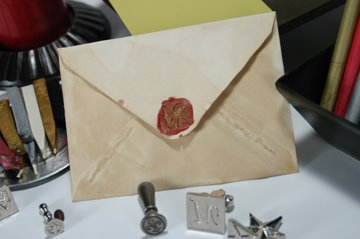
5. Highlight ink (from a metallic stamp pad) can be used on the seal before embossing to help the wax release the seal, as well as to create a dimensional look. Or you can add a little ink to a paintbrush and brush it into the seal.
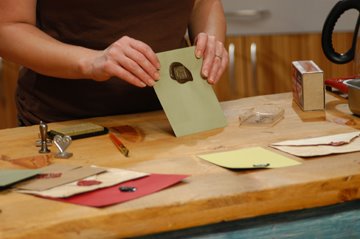
________________________________________

These sticks are from Save-on-Crafts

Make It: Sealing Envelopes with Wax Glue Sticks

Materials:

wax glue sticks
metal seal
low-temp glue gun (dedicated for this type of project)
paper
optional: metallic stamp pad

Steps:
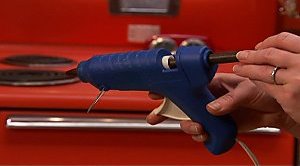
1. Insert a wax stick into a standard-size low-temp glue gun (use a second wax stick in the gun to help advance the first stick). Bring the gun to the desired temperature and rest it on a piece of foil to help reduce drips or wax strings on the work area.
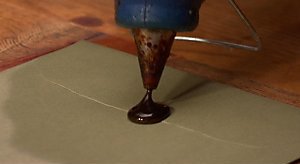
2. Use a few test pulls to get a feel for the quantity of wax to use with the seal. Two firm pulls of the trigger will produce a full seal for larger sealing coins. Waiting for 10-15 seconds before embossing the wax with a seal will create a better definition in the wax. Experiment to find the correct waiting period based on temperature conditions.
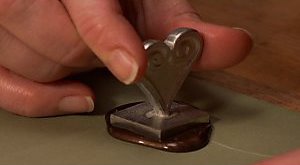
3. Emboss with a seal; remove by lifting straight up out of the wax. If the wax won’t let go of the seal, rest the seal on the wax until it’s completely cool, then lift the seal off. Highlighting ink (from a metallic stamp pad) can be used on the seal before embossing to help the wax release the seal, as well as creating a dimensional look on the seal.

Tips and Tricks: Alternating 1″ plugs of different colors of glue-gun wax sticks can create a unique marbling effect. Glue plugs can be created by cutting the glue sticks into sections with craft scissors.

(Visited 696 times, 1 visits today)

Posts you might be interested in......

  • Make it: Fun Paper Envelopes

    Make it: Fun Paper EnvelopesThis…

  • Glue Gun Spiderwebs

    Glue Gun Spider WebsSupplies:Hot Glue…

  • Make it: Handmade Paper

    Make it: Handmade PaperMaterials:10-15 sheets…

  • Make it: DIY Funky Folded Envelopes

    Make it: DIY Funky Folded…

  • paper crafts archive

    Paper Making 101Silhouette CuttingWax Sealing…

Category: Scrapbooking, Weddings

Follow Us

Facebooktwitterpinterestrssyoutubeinstagram
❮ ❮ Out and About in LA!
Bake it: Fruit Pizza ❯ ❯

Comments

  1. Evie's Tool Emporium says

    March 9, 2009 at 4:52 am

    I love to use my wax seals on all my personal letters! It adds so much to the look and feel of my letters! Great post!
    Michelle-

Trackbacks

  1. Creative Juice Craft Block Projects: January 10th says:
    April 3, 2015 at 7:14 pm

    […] Wax Sealing Shipping Tag Scrapbook Vintage Suitcase Shipping Caddy We are sending out a message: get […]

Find and Follow Me Here!

Facebook240
YouTube40
YouTube
Set Youtube Channel ID
Pinterest15
Pinterest
fb-share-icon
Instagram38
Tiktok46

Search

Shop my Amazon Store! I earn from qualifying purchases.

Cathie Filian

Follow along on my adventures!

Facebooktwitterpinterestrssyoutubeinstagram

Creative Juice on Discovery+

USA Embroidery Kits – Home Sweet Stitch – Now Available at ALL Walmart Stores!

New Videos at TikTok!

InstaLOVE

cathiefilian

Episode 3 🍁 DIY fall flannels with t-shirt appliqu Episode 3 🍁 DIY fall flannels with t-shirt appliqué and distressed painting. I’m using Fabric Mod Podge to create this quick and easy fall fashion! #tutorial
I’m using bathroom bleach and freezer paper to cre I’m using bathroom bleach and freezer paper to create this really cute stenciled bleach design! It’s such a fun way to create a custom pattern on any denim clothing. I’m doing a jean jacket, but you do you….this works with jeans cut off whatever you want.  for the appliqué I’m cutting out a design from a thrift shop hoodie and I use some iron on webbing just to secure that in place and then I sewed around the design with the machine, but you could of course just do a little hand stitch as well. I love how this turned out and I love making DIY looks for myself and the girls.
Episode 2 🍎 Back to School Teacher Gift Ideas with Episode 2 🍎 Back to School Teacher Gift Ideas with Dollar Tree Supplies and napkin decoupage with Mod Podge. 

These are all easy craft ideas that are budget friendly too! 

#dollartree #backtoschool #crafts
DIY Halloween Earrings! I’m using resin and molds DIY Halloween Earrings! I’m using resin and molds to create the spooky shapes. For the colors you can use pigments, mica powder, inks, glitter and paints. These are so fun to make! Let me know if you have any questions about this craft. #resinearrings #craft #halloween
DIY Purse Chains and Charms from Toys! I made this DIY Purse Chains and Charms from Toys! I made this for a special table-read visit to Bob’s Burgers! 🎉 wWhen I got invited… I knew I had to craft something to wear! I got the Louise doll at Five Below! 

These purse charms are easy to make with small toys. A few tips! 

Use beading wire and not stretchy cord. This helps with durability. 

When drilling toys, use a drillbit that is slightly smaller than your eye screw. Add a drop of clue if you would like to have a little extra security.

I like to add jump rings to the ends of my chains, so I can easily take them on and off purses.

these purse chains and charms are so easy to make. I hope you give this DIY a try.
Episode 1 🎃 Get ready for a Barbie Halloween Ghost Episode 1 🎃 Get ready for a Barbie Halloween Ghost Party! I’m using cheesecloth and Mod Podge Stiffy to create these adorable mini ghosts. Plus I’m doing napkin decoupage on Dollar Tree doll furniture. #halloween #crafts #dollartree
New class with @learnwithmichaels and Mod Podge! I New class with @learnwithmichaels and Mod Podge! I’m teaching some summer to fall Summerween projects that are perfect for Halloween and spooky Summer Movie Nights! These classes are always free… sign up to secure a spot. Link is in my bio. I’ll be live and it’s always sooooo much fun!
We ate all the things! Tonga room, Top of the Mark We ate all the things! Tonga room, Top of the Mark, Boudin and Fishermen’s Warf! Thank you San Francisco for the yummy bites.
Day 1 of our mini vacation. San Francisco! The ca Day 1 of our mini vacation. San Francisco!  The caviar shop was once Eddie’s dad’s clothing shop. (Filian’s…European Clothing) The house is the house from Mrs. Doubtfire. We went to Eddie’s High School and to see Lombard street. The hotel is from Vertigo. We are staying in Berkeley on the very tippy top of the hill. Can’t wait to see the view tonight! We made it in time to watch USA. Amazing!
Create an adorable 4th of July Dessert Display wit Create an adorable 4th of July Dessert Display with Mod Podge and dollar tree supplies. I’m making a tiered dessert stand, napkin holder and party
sign with just a few simple supplies and paper napkins! #dollartree #crafts #4thofjuly
Create custom high top sneakers with fabric and mo Create custom high top sneakers with fabric and mod podge! This easy DIY. Raft can be made in an afternoon! Add gems for a little sparkle! #crafts #diyfashion #tutorials
100 Years of Marilyn Monroe exhibit at the Academy 100 Years of Marilyn Monroe exhibit at the Academy Museum of Motion Pictures. This was so amazing to see…. So many gowns, dresses, memorabilia and photos. Truly amazing curated show by Chanel.
Ya know I love a clear bag makeover! This time I u Ya know I love a clear bag makeover! This time I used patches and purse charms to create these race day purses. 

🏁 Craft Tip: I like to use a little glue on my patches to make sure they are really attached! 

Basic supplies:
Clear purse
Decorative purse charms
Checkered purse straps
E6000 Glue
Race patches and letters too
Amazing good time at Monsterpalooza! We got our fa Amazing good time at Monsterpalooza! We got our fan pics with the ladies from “The Craft” - Fairuza Balk and Rachel True… so fun! So much to see and even props from The Burroughs on Netflix.
Napkin Decoupage Seashells! Make cute little ring Napkin Decoupage Seashells! Make cute little ring dishes with shells. This is a fun DIY for a craft night! #crafts #diy #seashells
Custom character bags for summer! This easy DIY is Custom character bags for summer! This easy DIY is made with paper napkins and Mod Podge! Craft up a cute pouch… then add bedazzled gems, charms and letter patches. #crafts #tutorial
Craft some summer vibes! Paint cute beach art. Cra Craft some summer vibes! Paint cute beach art. Craft a napkin decoupaged sea shell! #crafts #diy #tutorials
DIY Dollar Tree Candy Bouquet! I made this for our DIY Dollar Tree Candy Bouquet! I made this for our good friend who was in the school play. It was super easy to put together and he absolutely loved his candy bouquet. Follow for more budget friendly crafts and DIY ideas!
Here’s a little behind the scenes of making props Here’s a little behind the scenes of making props for the new Michael Jackson movie. 🍿 We spent weeks and weeks creating these guitar straps and the 🎸rhinestone bass guitar. Plus we hand stiffened and painted felt Jackson 5 banners. I lived howl the giant tissue paper flowers turned out! 🌸I always love doing props for TV and movies. I don’t get the opportunity very often but when I do, it’s always really cool projects and I really enjoy seeing the final designs on the big screen. #Props #crafts #michael
Happy Mother’s Day to all the Moms, Step-Moms and Happy Mother’s Day to all the Moms, Step-Moms and people who show up to parent. I hope you had a wonderful day. 💖 My weekend was filled with fun and yummy food! We did a day at DL and today we toured the Wilson Observatory. We stood where Hubble discovered the Expanding Universe. Pretty cool. Happy Mother’s Day!
Follow on Instagram

Storage Box Makeovers

https://youtu.be/JvKktgAqa60

Kids Lemonade Recipe

https://youtu.be/X19feCULxOE

How to Photo Transfer

https://youtu.be/5ZzHxJ7hZlM

Faux Geodes and Agate Slices

https://youtu.be/C4Acq_ilD5U

French Country Hutch Makeover

https://youtu.be/oHZ7PanFSaw

Shoe Makeover with Mod Podge

https://youtu.be/YhH9c18JYbg

Liquid Sculpey Pendants 101

https://youtu.be/9QLNgwkQuHk

Explore

4th of july Christmas cocktails Collage Clay Creative Juice Creative Juice Episodes Disneyland diy beauty dollar tree Easter fashion father's day Floral Design furniture flip Game Day halloween home home decor jewelry Kids Kids Crafts mod melter Mod Melts mod molds Mod Podge Mod Podge Fabric new year's eve organization parties party press Recipes recycled resin Round-Ups sculpey Sculpey Polymer Clay sewing shoes tablescapes Teacher Gifts Thanksgiving Universal Studios Valentine's Day weddings

What’s Trending Here

  • YOUTUBE MIWMP - 2017 - 1
  • 15 Mod Podge pumpkin Ideas
  • how to sew tie face mask with filter pocket
  • Sculpey III Geodes Multi Colors 1
  • 15-cone-trees

New Posts

  • How to Make Purse Charms from Toys PLUS my Table Read visit to Bob’s Burgers
  • Red Wine Spritzer Recipe
  • How to Make Corsage Flower Rings for Prom, Weddings and Bridesmaids DIY
  • DIY Junk Patch Trucker Hat for Race Game Day
  • Dollar Tree Craft Easter Egg Garland Fabric Decoupage
  • Dollar Tree Craft Fairy Lights with Wall Decals
  • Best Kid Friendly Chili Recipe Chili Cook Off Winner Aldi Ingredients

Categories

  • 101 Snappy Fashions (26)
  • 101 Tees (35)
  • 45 re-crafting projects (5)
  • Baby Shower (7)
  • bow wow wow (14)
  • Character DIYs (27)
  • Christmas (148)
  • Clay and Resin (28)
  • Craft Wars on TLC (6)
  • Creative Juice Holiday Special (6)
  • diary (129)
  • DIY Beauty (19)
  • DIY Videos (407)
  • Easter (46)
  • Eat and Drink (148)
  • EMMY Awards (15)
  • Fashion (198)
  • Father's Day (15)
  • Furniture Flip (24)
  • Game Day (20)
  • Graduation (2)
  • Halloween (171)
  • HGTV's Creative Juice (69)
  • Home and Garden (283)
  • Hot Glue Gun Helpers (33)
  • HSN and QVC (32)
  • Ideas for Kids and Families (132)
  • Local LA (7)
  • Mod Podge (288)
  • Mother's Day (29)
  • New Year's Eve (22)
  • News + Updates (167)
  • Party Ideas (44)
  • Patroitic (38)
  • PTA School Projects (22)
  • Round-Ups & Friends (20)
  • Scrapbooking (40)
  • Sewing Projects (59)
  • Sponsered + Giveaways (6)
  • St. Patrick's Day (7)
  • Supply Shop (19)
  • Teacher Gifts (28)
  • Thanksgiving (64)
  • The Filian Family (34)
  • Theme Parks & Cool Places (24)
  • Uncategorized (1)
  • Valentines Day (55)
  • Weddings (23)
  • Witch Crafts on HGTV and DIY (22)

Cottage Core DIY Doily Pumpkin for Fall and Halloween Decor

Dollar Tree DIY Spooky Napkin Decoupage Candles with Hot Glue

DIY Ghost Art Halloween Decor Craft with Doilies and Mod Podge

How to Add Fabric to Plastic Stacking Pumpkins with Mod Podge and Dollar Tree Crafts

Hocus Pocus DIY Sign How to Makeover Wood Signs with Napkins and Mod Podge

Beetlejuice Movie Night Treat Vanilla Puffed Pop Corn

© 2026 · Pretty Sweet Theme by, Pretty Darn Cute Design · A Genesis Child Theme · Images Courtesy of Lindsay Letters