CATHIE FILIAN's Handmade Happy Hour

Crafty Mom - Mess Maker - Content Creator

Find and Follow Me Here!

Facebook237
YouTube39
YouTube
Set Youtube Channel ID
Pinterest15
Pinterest
fb-share-icon
Instagram37
Tiktok45
  • Hello!
    • Hello! I’m Cathie Filian
    • News + Updates
    • The Filian Family
    • Featured On
    • Television
      • Creative Juice – HGTV
      • Craft Wars – TLC
      • Witch Crafts – DIY Network
      • Creative Juice Holiday Special
      • HSN and QVC
      • EMMY Awards
    • Product Design
      • Mod Melter, Molds & Melts
      • Mod Podge Accessories
      • Hot Glue Gun Helpers
      • Jewel Box POP
      • Product Design Awards
    • Books by Cathie
      • 101 Tees
      • 101 Snappy Fashions
      • DecoDen Desserts
      • Bow Wow WOW!
      • Creative Juice Book
      • Contributed + Featured
    • diary
  • Theme Parks & Cool Places
  • Character DIYs
  • Holidays & Celebrations
    • Christmas
    • Halloween
    • Easter
    • Valentines Day
    • New Year’s Eve
    • St. Patrick’s Day
    • 4th Of July
    • Thanksgiving
    • Weddings
    • Baby Shower
    • Mother’s Day
    • Father’s Day
    • Party Ideas
    • Game Day
    • Graduation
    • Teacher Gifts
  • Mod Podge Crafts
  • Crafts
    • Fashion
    • Sewing Projects
    • DIY Beauty
    • Home and Garden
    • Furniture Flip
    • Clay and Resin
    • Resin
    • Scrapbooking
    • Ideas for Kids and Families
    • PTA School Projects
  • Eat & Drink
  • DIY Videos
  • YouTube Handmade Happy Hour
  • YouTube Hello Crafty Kids
  • HGTV’s Creative Juice
  • Amazon Shop

Bohemian Style

October 5, 2008 · by: Cathie Filian

Bohemian style is in full swing on this episode of Creative Juice. We create a one-of-a-kind patchwork tack board with ceiling tiles, shed some light on a beautiful beaded lamp, and add some Bohemian flair to a plain old ring and mix up some red wide spritzers.
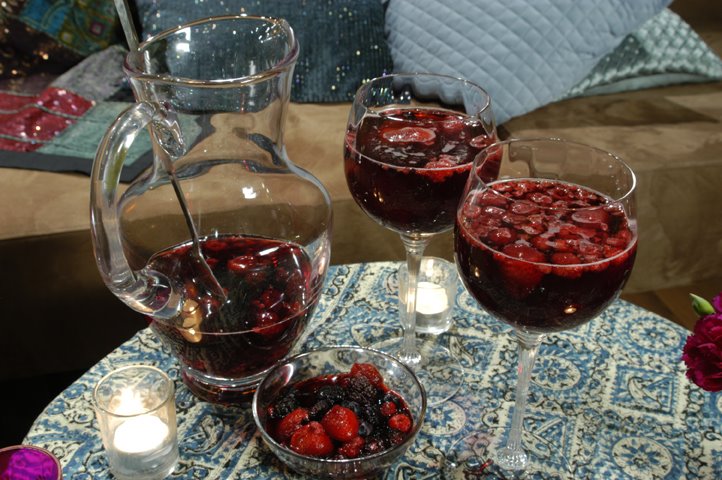
Red Wine Spritzers

Ingredients:
2 c. frozen berries, any variety
1 bottle, 750 ml, dry red table wine
1 qt. seltzer water

1. Fill large pitcher with the frozen berries and dry red wine; let stand 30 minutes.

2. Pour wine from the pitcher into wine glasses approximately halfway up the glass. Scoop a few berries into glasses.

3. Top off glasses with seltzer just prior to serving.
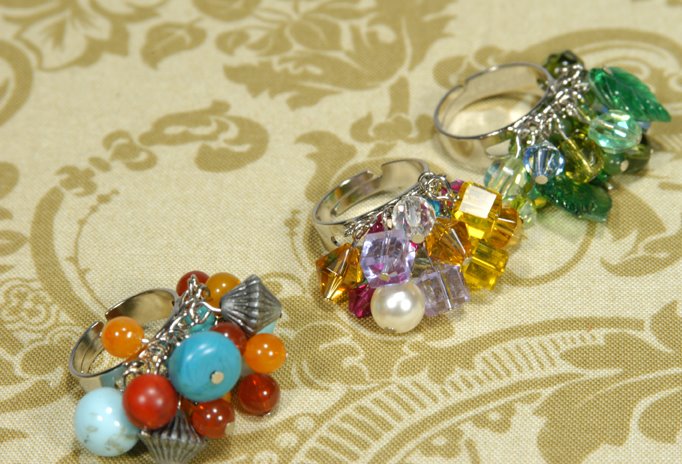
____________________________

Cha Cha Cha Ring

Materials:
cluster or charm ring blank
assorted beads
silver-tone head pins
rounds-nose pliers
wire-cutters

1. To create a charm, thread a head pin through one of the beads (if the beads are small, try putting two or three on each pin). Trim the head pin with wire-cutters, leaving just enough wire sticking out from the top of the pin to make a small loop with the round-nose pliers.

2. To make the ring, make a loop, leaving it slightly open, and link it to one of the loops on the ring blank. Close the loop with pliers.

3. Repeat steps until you are satisfied with the fullness of the ring, keeping in mind you can put more than one charm on each loop of the ring blank.
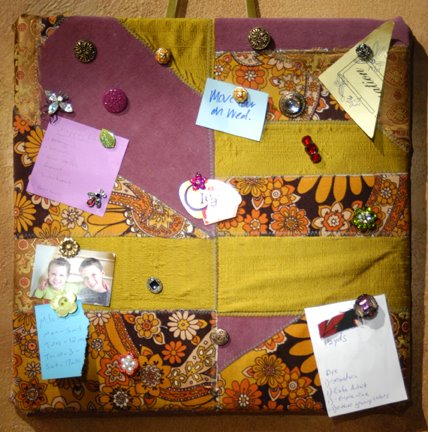
____________________________

Patchwork Tack Board and Pins

Materials:
acoustic ceiling tile (15″x15″), available at hardware stores (can be cut to size with a utility knife)
9″ quilting square
medium to heavy-weight fusible interfacing
scrap fabric (velvet, funky colors and prints)
Fabri-Tac glue
backing fabric or felt, cut slightly smaller than the tile
18″ of decorative ribbon
sewing machine
scissors
pinking shears
assorted brooches and buttons
heavy-duty flat thumbtacks
jewelry wire-cutters
E6000 glue

1. Use the quilting square to trace and cut out four 9″ squares of fusible interfacing.

2. Cut scrap fabric in random sizes and shapes and place on the adhesive side of the interfacing. Arrange the pieces of fabric to overlap with no interfacing showing.

3. Iron the fabric pieces to the interfacing using a dry, hot iron. Press down and hold to fuse the interfacing to the fabric scraps.

4. Using a zigzag stitch, topstitch over the edges of each piece of fabric, stitching them in a crazy-quilt pattern. Repeat for each of the four squares, trimming the edges to fit the fabric to the interfacing.

5. Lay out the four squares to make one large 18″x18″ square.

6. Overlap the edges of two squares and pin together. Use a zigzag topstitch to sew squares together. Repeat with the remaining two squares.

7. Overlap the two sets of squares and zigzag stitch together to complete the large square.

8. Lay fabric right side down and place ceiling tile on top of fabric; there should be a 3″ seam allowance on all sides of the tile.

9. Place a dot of Fabri-Tac glue on one corner of the tile. Pull the fabric taut, fold toward the center of the tile and press. Continue this process until all four corner are folded in and glued to the tile.

10. Place additional glue around the perimeter of the tile, and fold remaining fabric in center of tile.

11. Glue the ends of the 18″ ribbon to the back of the tile, 2″ from the top and 3″ from the side edges; the ribbon will act as a hanger.

12. Cut a piece of fabric 15″x15″ (slightly smaller than the tile) and glue to the back of the tile, covering the folded fabric to create a finished look.

13. Choose an assortment of brooches and buttons and remove all the hardware backings (pins and shank button pieces) with jewelry wire-cutters.

14. Using E6000, glue heavy-duty flat thumbtacks to the back of the brooches. This can be tricky, so make sure to lay it on a solid flat surface while it dries. Set aside and let dry for several hours.
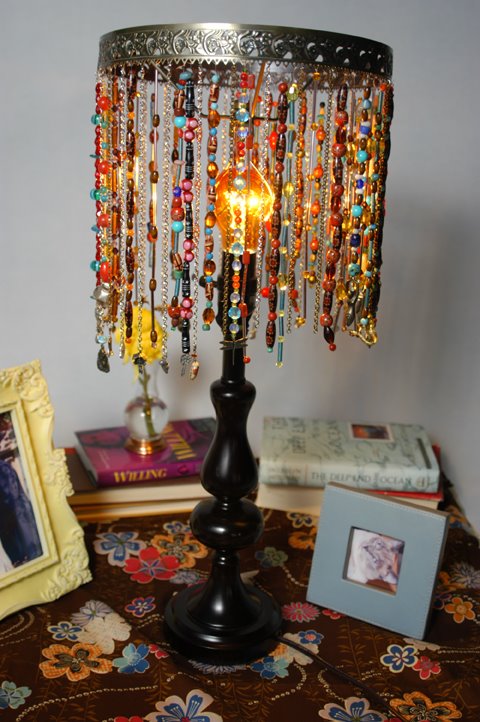
____________________________

Bohemian Beaded Lamp

Materials:
lampshade holder ring with drilled holes for hanging prisms
standard washer-top bulb clip
tall lamp
monofilament
painter’s or masking tape
medium-gauge jewelry chain
two pairs round-nosed jewelry pliers
4mm or 6mm jump rings
charms
miscellaneous beads of different sizes and colors
scissors
measuring tape

1. Cut monofilament line 4″ longer than the length of bead strands. To determine the length of the beaded strands, place lampshade ring on the lamp and measure how far down the beaded strands will hang. This measurement will vary depending on the height of the lamp. This shade is 8″ long, so the monofilament was cut to 12″ lengths.

2. Thread a large bead or charm on the monofilament and knot at the bottom to secure. Use a measuring tape to measure the strand and continue stringing beads on the line until the bead strand is 8″ long.

3. When the bead strand is the desired length, wrap a small amount of painter’s or masking tape to the end of the monofilament to prevent the beads from sliding off while working on additional strands.

4. Using round-nosed jewelry pliers, open a link in the jewelry chain to create the length of chain needed for the lamp; we used 9″ lengths of chain. Continue to make additional chain lengths.

5. Open a jump ring with the round-nosed pliers and attach a charm to one end of a length of chain.

6. Make enough beaded strands and lengths of chain with charms to attach to the drilled holes in the lampshade ring. We attached chain or strands to every other hole.

7. Tie the bead strands to the lamp by threading the top of the monofilament line through the drilled prism hole in the lampshade ring. Tie the monofilament in a double knot to secure the strand.

8. Attach the chain lengths to the lampshade ring by opening a jump ring with round-nosed pliers, threading the chain on the jump ring, inserting the jump ring through one of the drilled holes in the lampshade ring and closing the jump ring.

9. Trim away any excess monofilament and attach the shade to the lamp.

(Visited 275 times, 1 visits today)

Posts you might be interested in......

  • Make This: CHA CHA CHA RING

    Craft up a Cha Cha…

  • bake it: Freezing Avocados

    In our new house we…

  • CHA Bound!

    Steve and I are heading…

  • Egg Casserole

    Egg Casserole I have a…

Category: Home and Garden

Follow Us

Facebooktwitterpinterestrssyoutubeinstagram
❮ ❮ Meet the design team behind Alexander Henry Fabrics
Bow Wow WOW! is finally here…. ❯ ❯

Comments

  1. Rachel@oneprettything.com says

    October 6, 2008 at 4:33 pm

    I love that you post these, I’ll be linking to this.

  2. Susan says

    October 6, 2008 at 6:20 pm

    I was wondering where to find the “lampshade holder ring with drilled holes for hanging prisms” I have searched the net and can’t find anything. Please advise.

    Thank You!!

  3. cathie filian says

    October 6, 2008 at 6:26 pm

    Hi Try…

    Lampshade Holder Ring
    Jalanes, Inc.
    Website: http://www.jalanes.com

    Thanks,

    Cathie

  4. Susan says

    October 7, 2008 at 6:03 am

    Thank you so much!!!

  5. ELLIE says

    October 8, 2008 at 5:19 am

    OMG-absolutely outstanding – love the ideas – I have definitely saved these to try out – thanks for sharing them!!
    -Ellie

  6. Heather says

    October 8, 2008 at 11:54 pm

    If you don’t want to order a lampshade holder ring online, you could also head to your nearest Ikea and pick up the Rimfrost “lampshade”, and get 3 different sized rings and crystals to play with to boot.

    Here’s what it looks like: http://www.ikea.com/us/en/catalog/products/30103266

Find and Follow Me Here!

Facebook237
YouTube39
YouTube
Set Youtube Channel ID
Pinterest15
Pinterest
fb-share-icon
Instagram37
Tiktok45

Search

Shop my Amazon Store! I earn from qualifying purchases.

Cathie Filian

Follow along on my adventures!

Facebooktwitterpinterestrssyoutubeinstagram

Creative Juice on Discovery+

USA Embroidery Kits – Home Sweet Stitch – Now Available at ALL Walmart Stores!

New Videos at TikTok!

InstaLOVE

cathiefilian

Learn to make beach tissue paper paintings! On the Learn to make beach tissue paper paintings! On the blog: Search: Beach or >> https://www.cathiefilian.com/create-beach-art-and-decor-with-tissue-paper-and-mod-podge/ #crafts #diydecor #painting
DIY Polymer Clay Pendants.... these glow in the da DIY Polymer Clay Pendants.... these glow in the dark! So fun for festivals and concerts! On the Blog: https://www.cathiefilian.com/glow-in-the-dark-festival-jewelry-with-liquid-sculpey/ #crafts #polymerclay #festivalvibes
Hand paint shopping bags to make gift bags! I’m do Hand paint shopping bags to make gift bags! I’m doing the classic coach bag cherries. They are easy to paint and look so cute! Acrylic paints work best! #diy #crafts #handmade
DIY Polymer Clay Rings! These are so easy to make DIY Polymer Clay Rings! These are so easy to make and fun to wear! Make them wide or thin… wear them solo or stacked! I used metallic clay for the rings but you can do this same jewelry craft with any polymer clay. #crafts #jewelrymaking #polymerclayjewelry
Homemade chocolate chip ice cream. Screenshot this Homemade chocolate chip ice cream. Screenshot this yummy recipe and create this delicious ice cream at home. I’m adding chocolate chip chips, but you do you and add your favorite mix in. This recipe works with any ice cream maker and it makes the perfect sweet treat. #icecream #recipe #sweettreat
Easy upcycle craft idea! Recycle old tin cans into Easy upcycle craft idea! Recycle old tin cans into planters and vases! I’m doing napkin deco podge to create that adorable blue and white pattern. First clean out your tin can. Paint it with some white chalk paint. Apply mod podge. Then just add your napkin and once it’s dry seal with more mod Podge. These are so cute for spring decor and a budget friendly idea for creating centerpieces for any special occasions.
Dipped Basketball Oreos for March Madness! šŸ€ Inse Dipped Basketball Oreos for March Madness! šŸ€

Insert a skewer into the center of an Oreo cookie. Heat orange Candy Melts until melted. Dip the Oreo into the melts until the cookie is covered. Cool on wax paper. Apply black icing to form the lines of a basketball. 

#treats #diy #gameday
Behind the scenes of how I make my collage papers Behind the scenes of how I make my collage papers using watercolors. I grabbed these paints from Dollar tree and they worked perfect for this project. The first step is printing out inspiring words or words that would work with my project on a laser printer. And then I paint over them with watercolor, creating many different colors of my words for collage. I cut them into smaller pieces and use as needed for different craft projects. These papers I made for a workshop I did with a bunch of executives where they made handmade wish inspiration jars.
DIY Race Day Junk Patch Hat! Sport your favorite p DIY Race Day Junk Patch Hat! Sport your favorite players and team colors…. Add patches, letter beads and a charm chain! #gameday #truckerhat #diyfashion #patches
DIY Spoon Wall Art! I’m using paper, napkins and p DIY Spoon Wall Art! I’m using paper, napkins and plastic spoons to create this crafty cute wall art. I’m doing blue and white but you do you and pick your favorite colors. To make this porch, friendly spray with mod podge or use outdoor mod podge. #decoupage #crafts #tutorial
Napkin decoupage Easter eggs. I’m doing this techn Napkin decoupage Easter eggs. I’m doing this technique on plastic Easter eggs but you could easily do this on blown out eggs as well. I adore how this little bunny looks. šŸ‡ 

I’m attaching the napkins with Mod Podge! Such a sweet Easter decor craft!

#crafts #easter #modpodge
Winter 2026 Fun! We always try to squeeze in the f Winter 2026 Fun! We always try to squeeze in the fun! I hope you had a great winter! I’m looking forward to Spring Break! #photodump #momlife #craftymom
Cheer Spirit Clips! Made with clothespins and embe Cheer Spirit Clips! Made with clothespins and embellishments! Use letter breads to spell out words or use markers / paint pens. Sophia loves clipping these to other cheerleaders… spreading good luck and good vibes. The team took home two 1st place trophies plus a prize for all around! #crafts #cheer #cheermom
Dollar Tree Spring DIY Cake Stand! Make this in un Dollar Tree Spring DIY Cake Stand! Make this in under 5 min! I love these for cakes, cookies, fruit, cheese and crackers…. But it’s also perfect to display seasonal spring and Easter decorations! Mackenzie Childs dupe! #dollartree #springdecor #easter
Trader Joe’s Roses and a Dollar Tree Vase! Adorabl Trader Joe’s Roses and a Dollar Tree Vase! Adorable birthday flowers for a girl! I used two dozen purple roses and baby’s breath. The heart rhinestones are dollar tree! #crafts #dollartree #roses
Join me for my next online class! I’m making DIY f Join me for my next online class! I’m making DIY floral picks with quilting fabrics and Mod Podge! Classes are free with @learnwithmichaels online and you can always watch a replay. Sign up here> https://shorturl.at/7lDrM #crafts #tutorial #diy
Scrap fabric DIY patchwork bunny decor! This is to Scrap fabric DIY patchwork bunny decor! This is too cute for Easter and Spring! Make sure you use lots of prints and colors to create that classic patchwork look. I’m gluing everything down with matte mod podge. #crafts #tutorial #easterdecor #modpodge
Let’s make a spring floral arrangement and wine ho Let’s make a spring floral arrangement and wine holder! Learn how to make korker curls with fabric and Mod Podge! #crafts #diy #springdecor
Don’t toss your jars! Make Upcycled Easter Decor! Don’t toss your jars! Make Upcycled Easter Decor! I’m doing napkin decoupage in the lids! #diy #crafts #easterdecor
Surprise Easter Basket Gift Box! These are so fun Surprise Easter Basket Gift Box! These are so fun to make and give. I’m making this craft with boxes and candy from Dollar Tree. #easterbasket #crafts #dollartree
Follow on Instagram

Storage Box Makeovers

https://youtu.be/JvKktgAqa60

Kids Lemonade Recipe

https://youtu.be/X19feCULxOE

How to Photo Transfer

https://youtu.be/5ZzHxJ7hZlM

Faux Geodes and Agate Slices

https://youtu.be/C4Acq_ilD5U

French Country Hutch Makeover

https://youtu.be/oHZ7PanFSaw

Shoe Makeover with Mod Podge

https://youtu.be/YhH9c18JYbg

Liquid Sculpey Pendants 101

https://youtu.be/9QLNgwkQuHk

Explore

4th of july Christmas cocktails Collage Clay Creative Juice Creative Juice Episodes Disneyland diy beauty dollar tree Easter fashion father's day Floral Design furniture flip Game Day halloween home home decor jewelry Kids Kids Crafts mod melter Mod Melts mod molds Mod Podge Mod Podge Fabric new year's eve organization parties party press Recipes recycled resin Round-Ups sculpey Sculpey Polymer Clay sewing shoes tablescapes Teacher Gifts Thanksgiving Universal Studios Valentine's Day weddings

What’s Trending Here

  • YOUTUBE MIWMP - 2017 - 1
  • 15 Mod Podge pumpkin Ideas
  • how to sew tie face mask with filter pocket
  • Sculpey III Geodes Multi Colors 1
  • 15-cone-trees

New Posts

  • DIY Junk Patch Trucker Hat for Race Game Day
  • Dollar Tree Craft Easter Egg Garland Fabric Decoupage
  • Dollar Tree Craft Fairy Lights with Wall Decals
  • Best Kid Friendly Chili Recipe Chili Cook Off Winner Aldi Ingredients
  • Make Floral Fashion for Spring 3 Ideas Necklaces, Shoes and Sun Hats
  • How to Transfer Photos to Canvas Fabric with Mod Podge
  • DIY Sticker Earrings with Mod Podge Cute Grinch Craft

Categories

  • 101 Snappy Fashions (26)
  • 101 Tees (35)
  • 45 re-crafting projects (5)
  • Baby Shower (7)
  • bow wow wow (14)
  • Character DIYs (27)
  • Christmas (148)
  • Clay and Resin (28)
  • Craft Wars on TLC (6)
  • Creative Juice Holiday Special (6)
  • diary (129)
  • DIY Beauty (19)
  • DIY Videos (405)
  • Easter (46)
  • Eat and Drink (147)
  • EMMY Awards (15)
  • Fashion (196)
  • Father's Day (15)
  • Furniture Flip (24)
  • Game Day (20)
  • Graduation (2)
  • Halloween (171)
  • HGTV's Creative Juice (69)
  • Home and Garden (283)
  • Hot Glue Gun Helpers (33)
  • HSN and QVC (32)
  • Ideas for Kids and Families (132)
  • Local LA (7)
  • Mod Podge (288)
  • Mother's Day (28)
  • New Year's Eve (22)
  • News + Updates (167)
  • Party Ideas (44)
  • Patroitic (38)
  • PTA School Projects (22)
  • Round-Ups & Friends (20)
  • Scrapbooking (40)
  • Sewing Projects (59)
  • Sponsered + Giveaways (6)
  • St. Patrick's Day (7)
  • Supply Shop (19)
  • Teacher Gifts (28)
  • Thanksgiving (64)
  • The Filian Family (34)
  • Theme Parks & Cool Places (23)
  • Uncategorized (1)
  • Valentines Day (55)
  • Weddings (22)
  • Witch Crafts on HGTV and DIY (22)

Cottage Core DIY Doily Pumpkin for Fall and Halloween Decor

Dollar Tree DIY Spooky Napkin Decoupage Candles with Hot Glue

DIY Ghost Art Halloween Decor Craft with Doilies and Mod Podge

How to Add Fabric to Plastic Stacking Pumpkins with Mod Podge and Dollar Tree Crafts

Hocus Pocus DIY Sign How to Makeover Wood Signs with Napkins and Mod Podge

Beetlejuice Movie Night Treat Vanilla Puffed Pop Corn

© 2026 · Pretty Sweet Theme by, Pretty Darn Cute Design · A Genesis Child Theme · Images Courtesy of Lindsay Letters