 Plastic Fantastic on Creative Juice
Thursday – July 3rd on HGTV
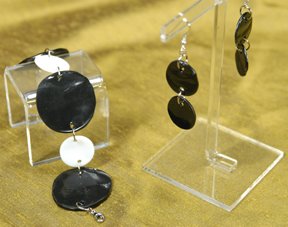 Shrink Plastic Jewelry
shrink plastic paper (black & white)
large circle punch
hole punch
large jump rings
embossing heat gun
bamboo skewer
bracelet clasp
round-nose pliers
scissors
Steps:
1. Using a circle punch, punch large circles in the shrink paper.
2. Punch two holes opposite each other on each circle.
3. Draw designs on the circles with metallic pens (for the black shrink paper) and colored pens (on the white paper).
4. Shrink with heat from an embossing gun. Hold the charm in place by inserting a bamboo skewer in the punched hole. Following manufacturer’s directions, the charm can be shrunk in an oven; press with a glass or other flat surface to flatten the charm, if necessary.
5. Using round-nose pliers, link the circles together with large jump rings and attach clasps at each end.
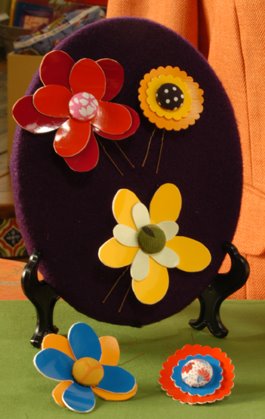 Fresh & Funky Hair Pins
shank style self-cover button
tiny scrap of fun fabric (flower center)
colored solid vinyl fabric
scallop scissors or pinking shears
scissors
one U-shaped hairpin
small piece of felt
Fabri-Tac glue
Steps:
2. Line the backing piece with the hole over the shank of the dome piece and snap the pieces together.
4. Pierce the center of the smallest flower shape with the tip of the scissors to create a small slit. Line up the larger flower shape behind the smaller one and position the slit in the same direction.
6. Thread a hairpin through the shank. Next cut a small circle of felt, thread it onto the two ends of the hairpin, secure with a drop of Fabri-Tac glue and let dry.
 Oilcloth Table Runner and Accessories
Materials (caddy):
large yogurt container
scissors
acetone-based nail polish remover
two colors of oilcloth (enough to wrap the container)
pinking shears
kraft paper
tacky glue
clothes pin
Steps:1. Thoroughly wash and dry container; if it has a lip around the top, remove the lip.
2. Use nail polish remover to remove any printed or gummy labels on the container.
3. Wrap a piece of kraft paper around the container and tape in place. Crease the paper where the ends meet to mark the place.
4. Push the top end of the kraft paper into the container and crease the bottom end around the bottom of the container. Remove the paper and, using the crease lines as a guide, trim to make a template.
5. Cut a piece of oilcloth to match the template with 1/2″ added for seam overlaps. Glue the oilcloth to the container.
6. Cut a thin strip from the second color of oilcloth with pinking shears, making sure it’s long enough to wrap around the top edge of the container. Glue the strip to the top edge of the container and use a clothespin to secure the trim until it dries.
Materials (napkin rings):
small scrap of oilcloth fabric
rickrack trim, 7″ per ring
pinking shears
hand needles and sewing thread
tacky glue
ruler
pencil
Steps:1. Working on the back of the oilcloth, use a ruler and pencil to mark a 2″x7″ rectangle. Use pinking sheers to create a zigzag edge.
2. Use tacky glue to attach the rickrack trim across the center of the runner, 1/4″ from the runner edge. Keep it flat and let it dry.
3. Round the rectangle to form a ring, and hand-stitch the ring closed. Add a drop of tacky glue for extra security.
Materials (table runner):
measuring tape
oilcloth fabric (the amount of fabric will depend on the size of the table)
rickrack trim (the amount of trim will depend on the size of the table)
pinking shears
tacky glue
yardstick
pencil
clothespins
painter’s tape or masking tape
Steps:1. Measure the table to determine the size of the runner.
2. Working on the back of the oilcloth, use a yardstick and a pencil to mark the measurements of the runner. Using pinking sheers, cut out the runner.
3. Use tacky glue to attach the trim around the edge of the runner, 2″ from the edge. You can either eyeball the measurement or place small pieces of painter’s tape 2″ from the edge at regular intervals to serve as a guide.
4. At a corner, fold the rickrack over at a 90-degree angle (rather than cutting it) to create a mitered corner; glue it in place. If needed, secure with a clothespin to keep it flat while the glue dries.


Wow! great projects. can’t wait to try the shrink paper bracelet! thanks for posting these!
cyndi