



CATHIE FILIAN's Handmade Happy Hour

Crafty Mom - Mess Maker - Content Creator

Find and Follow Me Here!

Facebook240
YouTube40
YouTube
Set Youtube Channel ID
Pinterest15
Pinterest
fb-share-icon
Instagram38
Tiktok46
  • Hello!
    • Hello! I’m Cathie Filian
    • Let’s Link Up!
    • News + Updates
    • The Filian Family
    • Featured On
    • Television
      • Creative Juice – HGTV
      • Craft Wars – TLC
      • Witch Crafts – DIY Network
      • Creative Juice Holiday Special
      • HSN and QVC
      • EMMY Awards
    • Product Design
      • Mod Melter, Molds & Melts
      • Mod Podge Accessories
      • Hot Glue Gun Helpers
      • Jewel Box POP
      • Product Design Awards
    • Books by Cathie
      • 101 Tees
      • 101 Snappy Fashions
      • DecoDen Desserts
      • Bow Wow WOW!
      • Creative Juice Book
      • Contributed + Featured
    • diary
  • YouTube
  • Holidays & Celebrations
    • Christmas
    • Halloween
    • Easter
    • Valentines Day
    • New Year’s Eve
    • St. Patrick’s Day
    • 4th Of July
    • Thanksgiving
    • Weddings
    • Baby Shower
    • Mother’s Day
    • Father’s Day
    • Party Ideas
    • Game Day
    • Graduation
    • Teacher Gifts
  • Character DIYs
  • Crafts
    • Mod Podge Crafts
    • DIY Videos
    • Fashion
    • Sewing Projects
    • DIY Beauty
    • Home and Garden
    • Furniture Flip
    • Clay and Resin
    • Resin
    • Scrapbooking
    • Ideas for Kids and Families
    • PTA School Projects
  • Eat & Drink
  • Hello Crafty Kids
  • HGTV’s Creative Juice
  • Amazon Shop
  • Theme Parks & Cool Places

Make it: Recycled Card Ornament

December 19, 2011 · by: Cathie Filian

Re-craft the stacks of holiday cards from years past…. and make…..ORNAMENTS! They are simple to make and after you make just one ornament you will have the hang of it!

Materials:
several used greeting or note cards
2-1/2″ punch, or a glass with a 2-1/2″ base for tracing
pencil
small scrap of cardboard
ruler
glue stick
binder clips
hole punch
decorative ribbon
optional — bone folder

1. Use the 2-1/2″ punch (or trace a 2-1/2″ glass base) to punch 20 circles from assorted cards. 2. Using a ruler and pencil, draw a triangle measuring 2-1/8″ on all sides on a scrap of cardboard; cut out the triangle to use as a template.
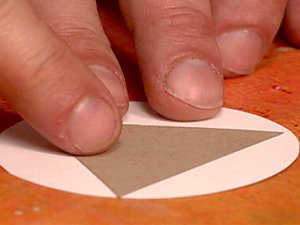
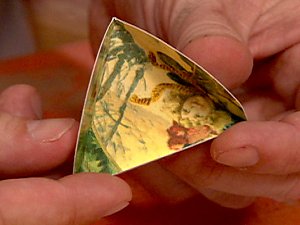
3. Trace the triangle onto the back of each greeting card circle and score each circle along the triangle lines using a bone folder or ruler. The circle should fold so the printed sides of each circle are on the interior of a small triangle-bowl shape.
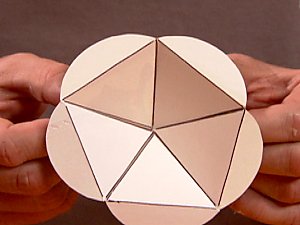
4. Using five of the scored circles, glue stick the flap of one circle to the flap of another, continuing with all five circles to form a star shape. Clamp together with binder clips and let dry for 15 minutes.

5. Working with 10 more greeting card circles for the middle layer, glue the flaps to the bottom layer flaps, clamp and let dry.
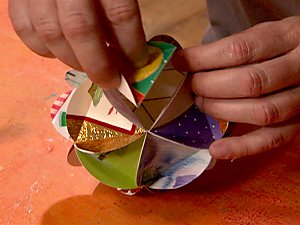

6. Use the last five greeting card circles to form a top layer. Glue, clamp and dry.
7. Punch one extended flap with the hole punch, thread a length of decorative ribbon and hang.

(Visited 396 times, 1 visits today)

Posts you might be interested in......

  • make it: Tomato cage Christmas Trees

  • Champagne 101

    Just in time for New…

  • Make it: Fun Paper Envelopes

    Make it: Fun Paper EnvelopesThis…

  • Make it: recycled paper bowls

    make it: Recycled Paper BowlsUse…

  • Make it: Handmade Paper

    Make it: Handmade PaperMaterials:10-15 sheets…

Category: Christmas

Follow Us

Facebooktwitterpinterestrssyoutubeinstagram
❮ ❮ Dollar Saving Holiday Ideas
DIY – Country Chic Christmas ❯ ❯

Comments

  1. jkru says

    December 11, 2008 at 4:33 am

    Ooh! I remember doing this in like 5th grade for an art project. It was really cute and the family still hangs it on the tree!

  2. Jen r. says

    December 14, 2008 at 6:34 pm

    This is a cute idea. I wish we could get the DIY channel!

  3. koolsaumya says

    December 15, 2008 at 11:38 am

    really cool girl……
    i remember to do this in a crafty book…
    but u gave better instructions then d book…
    thanx.

  4. Eileen says

    December 19, 2008 at 9:05 pm

    You can bet I will be making some of these.. what a wonderful tutorial!! I never found the perfect thing to do with old card.. and this looks like it might be it.

  5. a painter says

    December 20, 2008 at 11:30 am

    Love these! I remember making these in Girl Scouts many years ago. Thanks for the memory–and the great tutorial–and I must give them a try! Happy holidays to you!

  6. Anita, the Knitting Junkie! says

    December 22, 2008 at 10:48 pm

    Love. It.
    Thanks for sharing!

  7. Nikki says

    December 22, 2008 at 11:02 pm

    I feel like giving this tutorial out with every card I send, and to every person who sends me one!! What a lovely way top re-use something that would otherwise be “single use”. THank you!

  8. Fiona says

    December 29, 2008 at 7:41 pm

    these look great. thanks!

  9. Sara says

    October 22, 2009 at 7:02 pm

    This is a great project, but you can make even more gorgeous ones by recycling cereal box cardboard, stencilling in pastel colors on the blank side and assembling. Check them out at
    http://www.creativejewishmom.com under the category holidays:succah decor

  10. slammie says

    December 21, 2010 at 5:09 pm

    I did this in elementary school and my dad had them hanging from his office ceiling for years. Will have to do this this holiday season!

  11. THE OLD GEEZER says

    December 22, 2010 at 8:07 pm

    I added myself to follow your blog. You are more than welcome to visit mine and become a follower if you want to.

    God Bless You 🙂

    ~Ron

  12. islandgirl4 says

    December 11, 2012 at 3:45 pm

    I remember seeing you both on creative juice and I recorded it, my husband erased it. I am glad to see it again. We need to get theshow back on as a regular craft show daily on DIY and HDTV.

  13. Anonymous says

    December 15, 2014 at 8:21 pm

    I made ornaments for people using the Christmas cards THEY personally sent me through the years! Talk about re-cycling! Back to the original owner! And for those who I didn’t have enough cards from (like my nieces), I used cards that had their wedding or favorite colors. In a couple of cases, I used blank cardstock in the appropriate color, then punched a contrasting snowflake and glued it on the blank cell. This would be for up to 5 of the cells. Another idea I used is to put the recipient’s picture as one of the cells! One other idea: carefully put a tiny bit of glue along all the edges – then sprinkle with glitter. I do about 5 edges at a time. Makes it very sparklie! This is after it is all put together/ I also put a bell attached to a thin cord under the first “layer” of cells before I close it up. This makes for a very nice hanger. My favorite is gold for the cording and glitter, but you can use whatever color goes with the cards you use.

Find and Follow Me Here!

Facebook240
YouTube40
YouTube
Set Youtube Channel ID
Pinterest15
Pinterest
fb-share-icon
Instagram38
Tiktok46

Search

Shop my Amazon Store! I earn from qualifying purchases.

Cathie Filian

Follow along on my adventures!

Facebooktwitterpinterestrssyoutubeinstagram

Creative Juice on Discovery+

USA Embroidery Kits – Home Sweet Stitch – Now Available at ALL Walmart Stores!

New Videos at TikTok!

InstaLOVE

cathiefilian

DIY Halloween Spell Book! Create a Ghost Story Dio DIY Halloween Spell Book! Create a Ghost Story Diorama inside the pages of a book....Plus learn tips and tricks for creating spooky book covers! When crafting with books, please do so responsibly. Ask your local libraries and thrift shops for free books that are being sent to recycling. #halloween #crafts #halloweendecor
Elevate your game day purse with a DIY bag charm a Elevate your game day purse with a DIY bag charm and football patch! This tutorial is so quick and easy… and perfect for clear stadium bags! #diy #gameday #gamedayoutfit
Come with me… A day at YouTube… with Walmart and D Come with me… A day at YouTube… with Walmart and Dental Digest! So much fun and always something new to learn! #contentcreator
Midsummer Scream! It was such a blast and we met s Midsummer Scream! It was such a blast and we met so many cool people. Sophia got to try on Dracula’s cape! We met the OG actors from Scream and Bob Gurr! The Universal booth was so cool! #midsummerscream #halloween #horrorgram
Photo Transfer 101! Learn all the steps to transfe Photo Transfer 101! Learn all the steps to transfer your photos to fabric! I love doing this for customized gifts! #phototransfer #crafts #diy #handmade
Napkin Decoupage Sea Shells! These make adorable d Napkin Decoupage Sea Shells! These make adorable decor and gifts! I’m using satin Mod Podge and gold paint. #diy #crafts #beachvibes
DIY Dollar Tree Haunted House Decoupage Pumpkin! M DIY Dollar Tree Haunted House Decoupage Pumpkin! Made with Mod Podge, paper napkins and a toy dollhouse from Dollar Tree. Add fairy lights for a glow look! #crafts #dollartree #halloween
DIY Map Jewelry that looks boutique! Easy Mod Podg DIY Map Jewelry that looks boutique! Easy Mod Podge Hack!  I love making these necklaces as gifts, you can customize the pendants to any city! This decoupage technique works with scrapbook paper too. The glass like finish is Mod Podge Dimensional Magic. 

#Modpodge #jewelrymaking
Transform Dollar Tree plates into Halloween magic Transform Dollar Tree plates into Halloween magic with napkin decoupage and Mod Podge! #diy #crafts #halloween
DIY a Halloween rib cage dress! I’m using Mod Podg DIY a Halloween rib cage dress! I’m using Mod Podge, paint and lace to create custom spooky Halloween fashion! I started with a plain black dress but you can do this on any color. #diy #halloweencostume #halloween
Don’t be afraid to cut your t-shirts! ✂️ With just Don’t be afraid to cut your t-shirts! ✂️ With just a few snips you can create a cool custom look on any T-shirt. DIY fashion on a budget! 

#diyfashion #tshirts
Doilies and patchwork for Fall! Today I’ve got an Doilies and patchwork for Fall! Today I’ve got an epic craft filled episode to share. I’m creating fabric patchwork pumpkins that are no sew, dyed doilies, and doily granny denim fashion. #diyfashion #modpodge
Dollar Tree DIY Spooky Halloween Candles! Craft th Dollar Tree DIY Spooky Halloween Candles! Craft these with napkin decoupage and Mod Podge! #dollartree #halloweendecor #crafts
My girls just spent a week at Sleepaway summer cam My girls just spent a week at Sleepaway summer camp. I love this Camp so much. It’s 100 years old, all girls and no phones are allowed.  I like to do a little something special so that each day they have something to remind them of home so I send a letter for each day with a little goodie. #summercamp #sleepawaycamp #camphollywoodland
Episode 4 : learn how to make a resin alphabet to Episode 4 : learn how to make a resin alphabet to create custom backpack and purse charms. These are so cute for back to school! 

Resin 💖 purse charms 💖 diy fashion #resin
Episode 3 🍁 DIY fall flannels with t-shirt appliqu Episode 3 🍁 DIY fall flannels with t-shirt appliqué and distressed painting. I’m using Fabric Mod Podge to create this quick and easy fall fashion! #tutorial
I’m using bathroom bleach and freezer paper to cre I’m using bathroom bleach and freezer paper to create this really cute stenciled bleach design! It’s such a fun way to create a custom pattern on any denim clothing. I’m doing a jean jacket, but you do you….this works with jeans cut off whatever you want.  for the appliqué I’m cutting out a design from a thrift shop hoodie and I use some iron on webbing just to secure that in place and then I sewed around the design with the machine, but you could of course just do a little hand stitch as well. I love how this turned out and I love making DIY looks for myself and the girls.
Episode 2 🍎 Back to School Teacher Gift Ideas with Episode 2 🍎 Back to School Teacher Gift Ideas with Dollar Tree Supplies and napkin decoupage with Mod Podge. 

These are all easy craft ideas that are budget friendly too! 

#dollartree #backtoschool #crafts
DIY Halloween Earrings! I’m using resin and molds DIY Halloween Earrings! I’m using resin and molds to create the spooky shapes. For the colors you can use pigments, mica powder, inks, glitter and paints. These are so fun to make! Let me know if you have any questions about this craft. #resinearrings #craft #halloween
DIY Purse Chains and Charms from Toys! I made this DIY Purse Chains and Charms from Toys! I made this for a special table-read visit to Bob’s Burgers! 🎉 wWhen I got invited… I knew I had to craft something to wear! I got the Louise doll at Five Below! 

These purse charms are easy to make with small toys. A few tips! 

Use beading wire and not stretchy cord. This helps with durability. 

When drilling toys, use a drillbit that is slightly smaller than your eye screw. Add a drop of clue if you would like to have a little extra security.

I like to add jump rings to the ends of my chains, so I can easily take them on and off purses.

these purse chains and charms are so easy to make. I hope you give this DIY a try.
Follow on Instagram

Storage Box Makeovers

https://youtu.be/JvKktgAqa60

Kids Lemonade Recipe

https://youtu.be/X19feCULxOE

How to Photo Transfer

https://youtu.be/5ZzHxJ7hZlM

Faux Geodes and Agate Slices

https://youtu.be/C4Acq_ilD5U

French Country Hutch Makeover

https://youtu.be/oHZ7PanFSaw

Shoe Makeover with Mod Podge

https://youtu.be/YhH9c18JYbg

Liquid Sculpey Pendants 101

https://youtu.be/9QLNgwkQuHk

Explore

4th of july Christmas cocktails Collage Clay Creative Juice Creative Juice Episodes Disneyland diy beauty dollar tree Easter fashion father's day Floral Design furniture flip Game Day halloween home home decor jewelry Kids Kids Crafts mod melter Mod Melts mod molds Mod Podge Mod Podge Fabric new year's eve organization parties party press Recipes recycled resin Round-Ups sculpey Sculpey Polymer Clay sewing shoes tablescapes Teacher Gifts Thanksgiving Universal Studios Valentine's Day weddings

What’s Trending Here

  • YOUTUBE MIWMP - 2017 - 1
  • 15 Mod Podge pumpkin Ideas
  • how to sew tie face mask with filter pocket
  • Sculpey III Geodes Multi Colors 1
  • 15-cone-trees

New Posts

  • How to Make Purse Charms from Toys PLUS my Table Read visit to Bob’s Burgers
  • Red Wine Spritzer Recipe
  • How to Make Corsage Flower Rings for Prom, Weddings and Bridesmaids DIY
  • DIY Junk Patch Trucker Hat for Race Game Day
  • Dollar Tree Craft Easter Egg Garland Fabric Decoupage
  • Dollar Tree Craft Fairy Lights with Wall Decals
  • Best Kid Friendly Chili Recipe Chili Cook Off Winner Aldi Ingredients

Categories

  • 101 Snappy Fashions (26)
  • 101 Tees (35)
  • 45 re-crafting projects (5)
  • Baby Shower (7)
  • bow wow wow (14)
  • Character DIYs (27)
  • Christmas (148)
  • Clay and Resin (28)
  • Craft Wars on TLC (6)
  • Creative Juice Holiday Special (6)
  • diary (129)
  • DIY Beauty (19)
  • DIY Videos (407)
  • Easter (46)
  • Eat and Drink (148)
  • EMMY Awards (15)
  • Fashion (198)
  • Father's Day (15)
  • Furniture Flip (24)
  • Game Day (20)
  • Graduation (2)
  • Halloween (171)
  • HGTV's Creative Juice (69)
  • Home and Garden (283)
  • Hot Glue Gun Helpers (33)
  • HSN and QVC (32)
  • Ideas for Kids and Families (132)
  • Local LA (7)
  • Mod Podge (288)
  • Mother's Day (29)
  • New Year's Eve (22)
  • News + Updates (167)
  • Party Ideas (44)
  • Patroitic (38)
  • PTA School Projects (22)
  • Round-Ups & Friends (20)
  • Scrapbooking (40)
  • Sewing Projects (59)
  • Sponsered + Giveaways (6)
  • St. Patrick's Day (7)
  • Supply Shop (19)
  • Teacher Gifts (28)
  • Thanksgiving (64)
  • The Filian Family (34)
  • Theme Parks & Cool Places (24)
  • Uncategorized (1)
  • Valentines Day (55)
  • Weddings (23)
  • Witch Crafts on HGTV and DIY (22)

Cottage Core DIY Doily Pumpkin for Fall and Halloween Decor

Dollar Tree DIY Spooky Napkin Decoupage Candles with Hot Glue

DIY Ghost Art Halloween Decor Craft with Doilies and Mod Podge

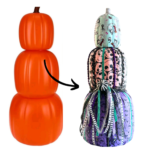
How to Add Fabric to Plastic Stacking Pumpkins with Mod Podge and Dollar Tree Crafts

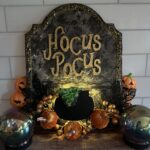
Hocus Pocus DIY Sign How to Makeover Wood Signs with Napkins and Mod Podge

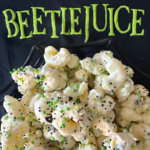
Beetlejuice Movie Night Treat Vanilla Puffed Pop Corn

© 2026 · Pretty Sweet Theme by, Pretty Darn Cute Design · A Genesis Child Theme · Images Courtesy of Lindsay Letters