CATHIE FILIAN's Handmade Happy Hour

Crafty Mom - Mess Maker - Content Creator

Find and Follow Me Here!

Facebook233
YouTube37
YouTube
Set Youtube Channel ID
Pinterest15
Pinterest
fb-share-icon
Instagram36
Tiktok45
  • Hello!
    • Hello! I’m Cathie Filian
    • News + Updates
    • The Filian Family
    • Featured On
    • Television
      • Creative Juice – HGTV
      • Craft Wars – TLC
      • Witch Crafts – DIY Network
      • Creative Juice Holiday Special
      • HSN and QVC
      • EMMY Awards
    • Product Design
      • Mod Melter, Molds & Melts
      • Mod Podge Accessories
      • Hot Glue Gun Helpers
      • Jewel Box POP
      • Product Design Awards
    • Books by Cathie
      • 101 Tees
      • 101 Snappy Fashions
      • DecoDen Desserts
      • Bow Wow WOW!
      • Creative Juice Book
      • Contributed + Featured
    • diary
  • Theme Parks & Cool Places
  • Character DIYs
  • Holidays & Celebrations
    • Christmas
    • Halloween
    • Easter
    • Valentines Day
    • New Year’s Eve
    • St. Patrick’s Day
    • 4th Of July
    • Thanksgiving
    • Weddings
    • Baby Shower
    • Mother’s Day
    • Father’s Day
    • Party Ideas
    • Game Day
    • Graduation
    • Teacher Gifts
  • Mod Podge Crafts
  • Crafts
    • Fashion
    • Sewing Projects
    • DIY Beauty
    • Home and Garden
    • Furniture Flip
    • Clay and Resin
    • Resin
    • Scrapbooking
    • Ideas for Kids and Families
    • PTA School Projects
  • Eat & Drink
  • DIY Videos
  • YouTube Handmade Happy Hour
  • YouTube Hello Crafty Kids
  • HGTV’s Creative Juice
  • Amazon Shop

Creative Juice Global Shipping

May 7, 2008 · by: Cathie Filian

Creative Juice – Episode # 302 – Global Shipping

We are sending out a message. Get crafting! A shipping-tag scrapbook makes for a unique way to hold on to cherished vacation memories. A caddy decorated with vintage stamps and labels helps keep all your supplies organized and wax sealing techniques give your letters a little extra personality. In the lounge, we are recycling water bottles into mailing vessels.

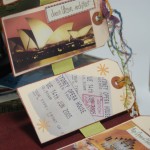
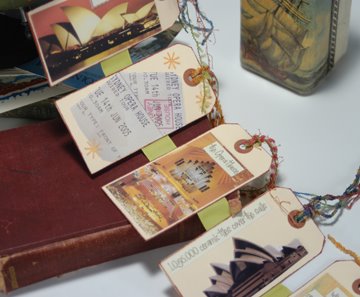
shipping tag scrapbook

Supplies:
16 Large shipping tags
Grosgrain ribbon
Decorative ribbon – 1 yard
Heavy-duty paper glue – acid free
Family & Friends photos
Scrapbook Embellishments
Rubberstamps
Fun Papers
Pigment Inkpad
Funky Fibers (by Fiberscaps)

Steps:
1. Rub the edges of all the shipping tags along the inkpad to create an antiqued edge.

2. Lay out 8 of the tags on your work surface and separate them about 1/2 inch. Glue the strip of grosgrain ribbon across the center of all 8 tags using a heavy-duty glue.

3. Glue the remaining 8 tags on top of the 8 tags with the ribbon. This creates a platform for decorating on both sides.

4. Creating the pages: Make each shipping tag into it’s own mini scrapbook page.

5. Tie funky fibers through the hole at top of each tag.

Vintage Stamp Shipping Caddy

Supplies:
Vintage “Train case” suitcases
Large assortment of stamps
Mod Podge
Small Paint brush
Foam paintbrush
Large tag shaped punch
Medium stamp sized punch
Scrapbook paper
Letter Rubber Stamps
Ink Pad

Steps:
1. Stamps can be bought in bulk from online auctions for just a few dollars.
2. Apply the stamps: Use the paintbrush and Mod Podge to glue the stamps to the train case, be as neat as possible. Allow to dry.
3. Using the scrapbook paper, punch out the tag-shaped punches, as many as there are letters in your name.  Then punch out the same number of stamp punches.
4. Stamp each stamp-shape with a letter.  Next, decoupage the stamped-stamp to a tag stamp, until you’ve spelled out your name.
5. Apply each tag shape with decoupage medium to affix to the case.
6. Fill with shipping supplies: stamps, tape, markers, scissors, labels.

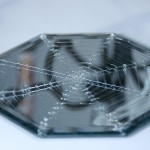
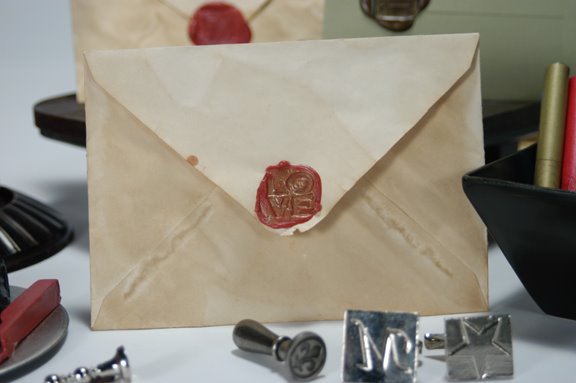
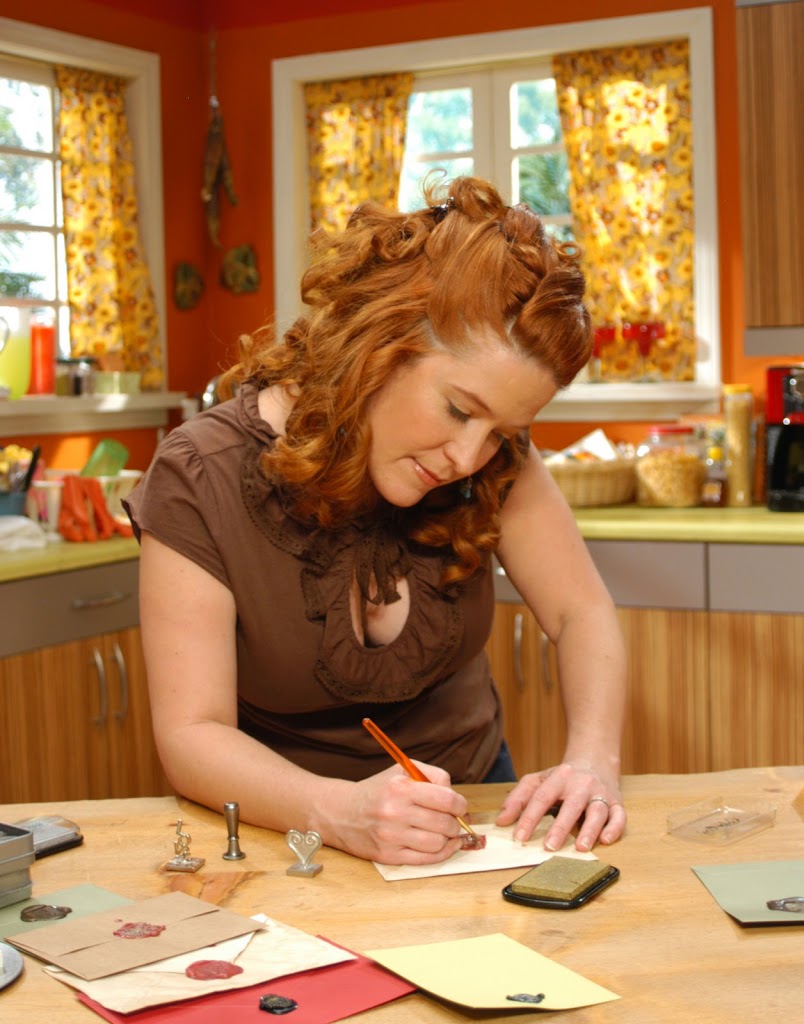
embellishing wax seals

Wax Sealing with Sealing Wax Candles

Supplies:
Sealing Wax Candle – by Seven Gypsies
Metal Seal – by Seven Gypsies
Envelopes
Paper
Matches
Optional: Metallic stamp pad

Steps:
1. For an antique look, wrinkle up your envelope, then let it soak in a coffee bath for a few seconds.  Give it a pat dry and set aside to dry.
2. Light the wick and hold the wax stick at a slight angle (lit end down).
3. Holding the stick over the area where you wish to make your seal, let the wax flow onto your project until you have enough wax to press your seal into – 10-15 seconds of melting the wax should produce enough for an average 1/4″ diameter seal. Be careful not to get soot into the wax.
4. Emboss with your seal and lift straight up. If you find the wax won’t let go of the seal, simply let your seal rest on the wax until the wax is completely cool, then lift your seal off.
5. You can also use highlighting ink (a metallic stamp pad) on your seal prior to embossing to help the wax release the seal, as well as creating a dimensional look on your seal.
6. You should be able to make 10-14 seals from one stick of our sealing wax candles.

Wax Sealing with Wax Glue Sticks
(This is the Glue Gun Style)

Supplies:
Wax Glue Sticks
Metal seal
Low temp glue gun – dedicated for this project
Paper
Optional: Metallic stamp pad
Steps:
1. Insert your wax stick into standard sized low temp glue gun. Use a second wax stick in the gun to help advance the first. Bring the gun to temperature. Resting the gun on a piece of foil will help keep any drips or strings off of your work area.
2. Use a few test pulls to get a feel for the quantity of wax you would like to use with your seal. Two good pulls of the trigger will produce a full seal for the larger sealing coins.
3. Waiting for 10-15 seconds before you emboss the wax with you seal will create better definition in the wax. Experiment to find the correct waiting period for the conditions in your area.
4. Emboss with your seal and lift straight up. If you find the wax won’t let go of the seal, simply let your seal rest on the wax until the wax is completely cool, then lift your seal off.
5. You can also use highlighting ink (a metallic stamp pad) on your seal prior to embossing to help the wax release the seal, as well as creating a dimensional look on your seal.
6. Alternating 1″ plugs of different colors of glue gun wax will create a unique marbling effect. You can create plugs by cutting the glue sticks with craft scissors.

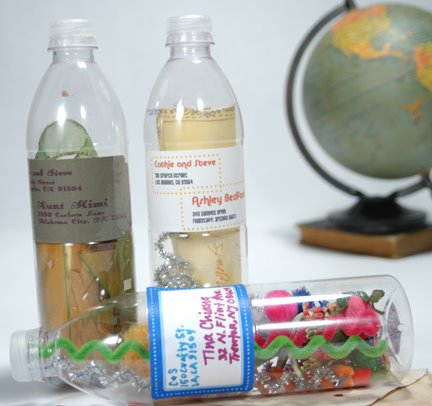
message in a bottle mailers

Supplies:Plastic bottle with a secure screw top lid
Sticky address & return address labels
Letter
Ribbon curls and confetti
Postage

Steps:

1. Fill the bottle with confetti and ribbon curls or anything that is light and fun. (Glitter pom-pom balls, sequins and small toys are great)

2. Roll the letter into a tight roll.  Secure with a piece of ribbon (optional). Place in the bottle.

3. Secure the lid onto the bottle (use tape if necessary) and attach the address labels. Have the bottle weighed at the post office and attach the proper postage. Pop in the mail.

(Visited 165 times, 1 visits today)

Posts you might be interested in......

  • Creative Juice Episode: Bloom

    No green thumb? No problem!Tune…

  • Glue Gun Spiderwebs

    Glue Gun Spider WebsSupplies:Hot Glue…

  • Make It: Shipping Tag Scrapbook

    Make It: Shipping-Tag ScrapbookCreate a…

  • New Episodes of Creative Juice

    Woo Hoo! 13 New Episodes…

  • Emmy Nominations for Creative Juice

    Steve and I are thrilled…

Category: HGTV's Creative Juice

Follow Us

Facebooktwitterpinterestrssyoutubeinstagram
❮ ❮ Martha Stewart Radio
Kids Fairy Tale Crafts ❯ ❯

Find and Follow Me Here!

Facebook233
YouTube37
YouTube
Set Youtube Channel ID
Pinterest15
Pinterest
fb-share-icon
Instagram36
Tiktok45

Search

Shop my Amazon Store! I earn from qualifying purchases.

Cathie Filian

Follow along on my adventures!

Facebooktwitterpinterestrssyoutubeinstagram

Creative Juice on Discovery+

USA Embroidery Kits – Home Sweet Stitch – Now Available at ALL Walmart Stores!

New Videos at TikTok!

InstaLOVE

cathiefilian

Let’s make a spring floral arrangement and wine ho Let’s make a spring floral arrangement and wine holder! Learn how to make korker curls with fabric and Mod Podge! #crafts #diy #springdecor
Don’t toss your jars! Make Upcycled Easter Decor! Don’t toss your jars! Make Upcycled Easter Decor! I’m doing napkin decoupage in the lids! #diy #crafts #easterdecor
Surprise Easter Basket Gift Box! These are so fun Surprise Easter Basket Gift Box! These are so fun to make and give. I’m making this craft with boxes and candy from Dollar Tree. #easterbasket #crafts #dollartree
Everything was TINY! Come with me to Mini CON in L Everything was TINY! Come with me to Mini CON in Las Vegas. This was an artisan show with handmade and crafted dollhouse furniture and accessories. The workmanship was amazing! #Miniatures #Handmade #dollhouse #minicon #crafts
Mini Charm Necklace! Easy jewelry making with ador Mini Charm Necklace! Easy jewelry making with adorable charms and link chain! Made this for the mini convention I’m attending in Vegas. #jewelrymaking #crafts #charms
Book Club Cute Stuff! Spotted at Michaels I seriou Book Club Cute Stuff! Spotted at Michaels I seriously want it all! Book and wine night never looked so cute. #bookclub #craft #michaels
Dollar Tree DIY Fairy Lights! Create this cute hom Dollar Tree DIY Fairy Lights! Create this cute home decor with wall decals and a candle holder from Dollar Tree! I 🩷 how sweet this turns out! #dollartree #crafts #diy #homedecor
Happy Friday the 13th! Have a peek at our last Fri Happy Friday the 13th! Have a peek at our last Friday the 13th! We love movie night parties… especially spooky movie night. We made Homemade Italian Sodas that were so delicious. Plus we set up a candy and popcorn bar! #fridaythe13th #movienight #diy
Napkin Decoupaged Perfume Bottles! I 🩷 these so mu Napkin Decoupaged Perfume Bottles! I 🩷 these so much! Adorable to gift and adorable to display. Sol de janeiro  never looked so cute! #perfume #decoupage #handmade #soldejaneiro
New Michaels Class! Link in story. 2/10 join live New Michaels Class! Link in story. 2/10 join live or catch a replay.  DIY Mod Podge spring fashion class. It’s free! Sign-up here: https://www.michaels.com/class/diy-spring-floral-fashion-fabric-decoupage-cowboy-hats-trucker-hats-jeans-and-purse-straps-411767192931824-411767161081328 #crafts #diyfashion #modpodge
DIY 🩷 Valentine Trucker Hat! I’m still obsessed wi DIY 🩷 Valentine Trucker Hat! I’m still obsessed with this candy heart fabric. Using fabric mod podge for this fashion craft. These hat makeovers are so fun and easy to do! #crafts #tutorial #diyfashion
DIY Valentine Decor! Craft this adorable decoupage DIY Valentine Decor! Craft this adorable decoupaged LOVE art with scrapbook paper and Mod Podge. I’m doing pinks and reds for Valentine’s Day but you do you! #crafts #diydecor #tutorial
Dollar Tree Napkin Decoupage Tin Can Vases for Val Dollar Tree Napkin Decoupage Tin Can Vases for Valentine’s Day! Create these cute handmade bouquets with Mod Podge and a few supplies. #crafts #dollartree #decoupage
Who’s your Valentine? 🩷 DIY Valentine Cards and En Who’s your Valentine? 🩷 DIY Valentine Cards and Envelopes! I’m using envelope templates to create this craft. The papers and templates are all from @michaelsstores 🩷 #crafts #tutorial #papercrafts
Make hair bows with fabric! These are no sew….. I’ Make hair bows with fabric! These are no sew….. I’m using fabric Mod Podge and hot glue! I love how these turn out and the bow can be used for so many crafts.. nit just hair bows! Think garlands, home decor, package tie on…. It’s endless. #crafts #tutorial #craftideas #hairbows
Create rhinestone brooches with buttons and jewelr Create rhinestone brooches with buttons and jewelry making supplies. These were all under 3 dollars to make and they look so cute on a jean jacket. I like to layer a few up for impact. Love the rhinestones! #jewelrymaking #brooches #crafts #tutorials
Use Dollar Tree boxes to create a surprise Valenti Use Dollar Tree boxes to create a surprise Valentine gift box that is filled with candy and explodes when you open it! #valentines #craft #dollartree
Tissue paper pendants! I made these with Mod Podge Tissue paper pendants! I made these with Mod Podge and gift wrap tissue paper from Daiso. I love how the black and natural wood look together. You could paint the wood a light color first. #crafts #jewelrymaking #tutorial
You Had Me At Hello! DIY Valentine Decor Art made You Had Me At Hello! DIY Valentine Decor Art made with gift wrap tissue paper, craft paints, and mod podge. I love how this turned out. I’m planning on hanging this in the girls room for all year round even though it actually made this for Valentine’s Day! #crafts #tutorial #valentines
Hello 2026! Who is excited for 2026? I’m excited f Hello 2026! Who is excited for 2026? I’m excited for the new year…. Just started 🎬 projects, hosting game day fun and getting ready for back to school after break. I hope your new year is off to a great start!
Follow on Instagram

Storage Box Makeovers

https://youtu.be/JvKktgAqa60

Kids Lemonade Recipe

https://youtu.be/X19feCULxOE

How to Photo Transfer

https://youtu.be/5ZzHxJ7hZlM

Faux Geodes and Agate Slices

https://youtu.be/C4Acq_ilD5U

French Country Hutch Makeover

https://youtu.be/oHZ7PanFSaw

Shoe Makeover with Mod Podge

https://youtu.be/YhH9c18JYbg

Liquid Sculpey Pendants 101

https://youtu.be/9QLNgwkQuHk

Explore

4th of july Christmas cocktails Collage Clay Creative Juice Creative Juice Episodes Disneyland diy beauty dollar tree Easter fashion father's day Floral Design furniture flip Game Day halloween home home decor jewelry Kids Kids Crafts mod melter Mod Melts mod molds Mod Podge Mod Podge Fabric new year's eve organization parties party press Recipes recycled resin Round-Ups sculpey Sculpey Polymer Clay sewing shoes tablescapes Teacher Gifts Thanksgiving Universal Studios Valentine's Day weddings

What’s Trending Here

  • YOUTUBE MIWMP - 2017 - 1
  • 15 Mod Podge pumpkin Ideas
  • how to sew tie face mask with filter pocket
  • Sculpey III Geodes Multi Colors 1
  • 15-cone-trees

New Posts

  • Dollar Tree Craft Easter Egg Garland Fabric Decoupage
  • Dollar Tree Craft Fairy Lights with Wall Decals
  • Best Kid Friendly Chili Recipe Chili Cook Off Winner Aldi Ingredients
  • Make Floral Fashion for Spring 3 Ideas Necklaces, Shoes and Sun Hats
  • How to Transfer Photos to Canvas Fabric with Mod Podge
  • DIY Sticker Earrings with Mod Podge Cute Grinch Craft
  • Dollar Tree Glass Marble Pendant Necklaces with Mod Podge

Categories

  • 101 Snappy Fashions (26)
  • 101 Tees (35)
  • 45 re-crafting projects (5)
  • Baby Shower (7)
  • bow wow wow (14)
  • Character DIYs (27)
  • Christmas (148)
  • Clay and Resin (28)
  • Craft Wars on TLC (6)
  • Creative Juice Holiday Special (6)
  • diary (129)
  • DIY Beauty (19)
  • DIY Videos (404)
  • Easter (46)
  • Eat and Drink (147)
  • EMMY Awards (15)
  • Fashion (195)
  • Father's Day (15)
  • Furniture Flip (24)
  • Game Day (19)
  • Graduation (2)
  • Halloween (171)
  • HGTV's Creative Juice (69)
  • Home and Garden (283)
  • Hot Glue Gun Helpers (33)
  • HSN and QVC (32)
  • Ideas for Kids and Families (132)
  • Local LA (7)
  • Mod Podge (288)
  • Mother's Day (28)
  • New Year's Eve (22)
  • News + Updates (167)
  • Party Ideas (44)
  • Patroitic (38)
  • PTA School Projects (22)
  • Round-Ups & Friends (20)
  • Scrapbooking (40)
  • Sewing Projects (59)
  • Sponsered + Giveaways (6)
  • St. Patrick's Day (7)
  • Supply Shop (19)
  • Teacher Gifts (28)
  • Thanksgiving (64)
  • The Filian Family (34)
  • Theme Parks & Cool Places (23)
  • Uncategorized (1)
  • Valentines Day (55)
  • Weddings (22)
  • Witch Crafts on HGTV and DIY (22)

Cottage Core DIY Doily Pumpkin for Fall and Halloween Decor

Dollar Tree DIY Spooky Napkin Decoupage Candles with Hot Glue

DIY Ghost Art Halloween Decor Craft with Doilies and Mod Podge

How to Add Fabric to Plastic Stacking Pumpkins with Mod Podge and Dollar Tree Crafts

Hocus Pocus DIY Sign How to Makeover Wood Signs with Napkins and Mod Podge

Beetlejuice Movie Night Treat Vanilla Puffed Pop Corn

© 2026 · Pretty Sweet Theme by, Pretty Darn Cute Design · A Genesis Child Theme · Images Courtesy of Lindsay Letters